Help Topic: Adding an image to a post
By far the number one thing people contact the PDD Help Dept. about is uploading an image to a post. It’s actually a pretty simple thing, but there are just enough tricks to screw up a newbie. Since it’s much easier to learn with a visual aid, PDD Intern Kelsey Marier put together this video.
We don’t have any other video help topics, but those of you with other questions can refer to PDD’s Help Topic Index at any time by hovering over the Blog option on the main menu at the top of the page and selecting Help Topics.
Below is our text description of how to add an image to a post, for any weirdo who prefers long, draw out explanations with hardly any visual references.
- First of all, you should size your photo before uploading it. PDD won’t let you upload a file that is 2MB or larger, and there is no reason for your image to be more than 1,000 pixels wide or high. The largest it can appear on a page is 746 pixels in width (although if readers click on the image they can see it larger).
- Once you’ve sized your image properly, you may proceed with logging in and creating a post, which this advice assumes you know how to do.
- Between the field where you enter the headline of your post and the icons for altering the text of the body of your post is a button labeled “Add Media.” Click it. (NOTE: If you do not see the “Add Media” option it’s because your account does not allow for image uploads. Send an e-mail to help @ perfectduluthday.com explaining that you are a moderately sane person with good intentions and an administrator will likely upgrade your status if you present a convincing case.)
- A window titled “Insert Media” should pop up, which will display a library of images previously uploaded. Switch the tab at the top to “Upload Files” to search your computer for the image you want. You can either drag your image from your desktop into the box, or select the file.
- Once you have uploaded your image it will appear in the Media Library with a blue outline and a box checked in the upper right corner. That means it is selected to be imported into your post.
- In the column to the right you’ll see options such as “Title,” “Caption,” “Alt text” and “Description.” You don’t really have to bother with them, unless you want to write a caption.
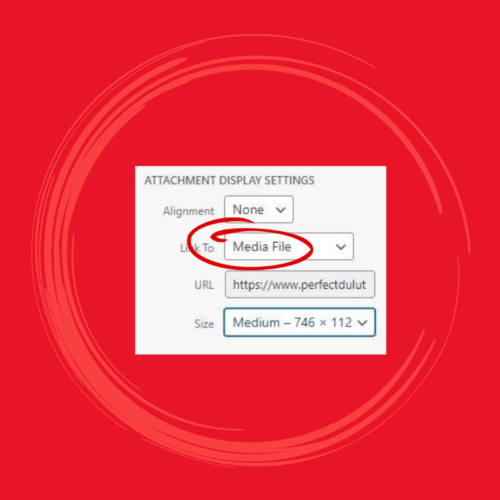
- Under “Attachment Display Settings” for “Alignment” you should choose “None” unless you have a small image you want to wrap text around, in which case you would choose “Left.” Please do not center an image.
- Under size, you can select if you want your image to be a small thumbnail, medium, large or full size. Large is generally the best option for standard landscape-oriented images. If you have an image that is square or horizontal/portrait orientation, Medium is generally the best option.
- For the “Link To” field, always select “Media File.” A lot of people mess that up, so we have a big red graphic to illustrate it.
- Click on “Insert into post” and the image should appear wherever you left your cursor when you clicked “Add an Image” to start this process.
- You can pull the little squares in the corner of the image to make it larger or smaller. (Sometimes that option doesn’t work in certain web browsers; we are not sure why.)
- Once you’re satisfied with the size of your image, and you’re done writing whatever text you desire, click the blue “Publish” button on the right as usual, and your post, with image, should appear on PDD for all to see, after it is reviewed by a moderator.
Recommended Links:
Leave a Comment
Only registered members can post a comment , Login / Register Here


No Comments