Break them up, remove the pieces, build a form and re-pour the cement.
I once tried using patching cement to fill cracks in a cement wall that looked just like the cracks in your photo. It looked great, until after the first winter, then the cracks came back.
Use sledge hammer to smash out all the “soft” moisture-damaged concrete on those bottom two stairs. Sweep out the dust. Build and mount, with stakes and braces, two simple wood plank vertical forms to shape the front edge of those two steps. Spray water on the whole thing to clean out the dust and make a better bond between old and new concrete. Then mix up a few bags (I’d guess three bags) of ready-mix concrete, pour into your forms and smooth the top surfaces. Remember to brush the wet concrete on top surfaces after troweling so it won’t be too slippery when it rains. This will all take you 1-2 hours and about $15-20. Then fix your gutter or whatever is dropping water onto the steps so you won’t have to do it again in two years.
C’mon people, if we know so much about concrete, why hasn’t the concrete book at the library been checked out in over 12 years? (or something to that effect – its from a Miller Lite radio commercial a few years ago). Can the two bad steps be formed up and new concrete added to them? It would change the geometry of the steps, but the rest of the steps look structurally fine.
No gutter, this is the first landing in a two-tier flight. As I look at it though, this would be where the snow throw line is from the street. Maybe it’s the salt and whatever else. It has to be the original from the early 1920s. When cement was mixed with big old rocks. That’s what is falling out.
1. Prep: Chip out the old, crumbly, unsound concrete (try a plain hammer and a cheap chisel, wear goggles.) Wire-brush out the crumbs. Rinse clean the area with plain water.
2. Use “vinyl cement patch” for the repair, usually sold in buckets at home stores. Follow mixing instructions carefully — too runny and your patch will “sag” and fall out of the repair on the vertical surfaces. With the trowel, push vinyl cement mix into the damaged area and smooth.
3. Allow to cure 24 hours before subjecting to foot traffic.
This should last several years at least – you might have to touch up then.


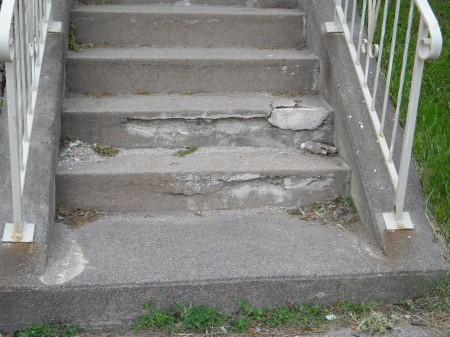
Break them up, remove the pieces, build a form and re-pour the cement.
I once tried using patching cement to fill cracks in a cement wall that looked just like the cracks in your photo. It looked great, until after the first winter, then the cracks came back.
Break apart. Replace with escalator.
I’m with hotshot, but only replace it with one of those stair climber chairs.
Use sledge hammer to smash out all the “soft” moisture-damaged concrete on those bottom two stairs. Sweep out the dust. Build and mount, with stakes and braces, two simple wood plank vertical forms to shape the front edge of those two steps. Spray water on the whole thing to clean out the dust and make a better bond between old and new concrete. Then mix up a few bags (I’d guess three bags) of ready-mix concrete, pour into your forms and smooth the top surfaces. Remember to brush the wet concrete on top surfaces after troweling so it won’t be too slippery when it rains. This will all take you 1-2 hours and about $15-20. Then fix your gutter or whatever is dropping water onto the steps so you won’t have to do it again in two years.
One word. Dynamite.
C’mon people, if we know so much about concrete, why hasn’t the concrete book at the library been checked out in over 12 years? (or something to that effect – its from a Miller Lite radio commercial a few years ago). Can the two bad steps be formed up and new concrete added to them? It would change the geometry of the steps, but the rest of the steps look structurally fine.
Berv, did you not read what Diggs wrote?
Weird. That comment wasn’t there when I composed my comment.
No gutter, this is the first landing in a two-tier flight. As I look at it though, this would be where the snow throw line is from the street. Maybe it’s the salt and whatever else. It has to be the original from the early 1920s. When cement was mixed with big old rocks. That’s what is falling out.
Thanks for the tips so far!
One word. Photoshop.
Diggs, I generally agree but think a sledgehammer is overkill. As always with home projects the devil is in the prep work.
Spy1, I’m assuming you don’t want to replace the whole step (at least right now).
Stuff: hammer, cheap chisel, goggles, wire brush, trowel, vinyl cement patch (mix).
1. Prep: Chip out the old, crumbly, unsound concrete (try a plain hammer and a cheap chisel, wear goggles.) Wire-brush out the crumbs. Rinse clean the area with plain water.
2. Use “vinyl cement patch” for the repair, usually sold in buckets at home stores. Follow mixing instructions carefully — too runny and your patch will “sag” and fall out of the repair on the vertical surfaces. With the trowel, push vinyl cement mix into the damaged area and smooth.
3. Allow to cure 24 hours before subjecting to foot traffic.
This should last several years at least – you might have to touch up then.
Photoshop seems like the most logical solution to me.
JB Weld.
/end of discussion.
Well, JB Weld and glitter.